Available Software
Where can I find software on CS machines?
On the CS linux machines, the installed software comes from either CentOS’s repositories or is built from source. Packages from repositories get installed under standard system locations (like /bin, /usr/bin, etc).
Software built from source is installed under /usr/local/<sw-name>
How do I know if a system binary is installed?
To find look for a binary use the command:
which <binary-name>For example, if you would like know if the binary npm is installed:
which npmIf the binary is available, the above command would show the path in the output:
/bin/npmAnd if it is not available, the command would say that it’s not available.
which foo

which: no foo in (/bin:/usr/bin:/sbin:/usr/sbin:/usr/local/bin)How do I know if a system package is installed?
If you know the exact name of the package, then you can query if it is installed by the command:
rpm -q <package-name>The above command returns the package version, if the package is installed.
For instance, to check if the package “gcc” is available:
rpm -q gcc
gcc-8.3.1-5.1.el8.x86_64If you do not know the exact package name, use the following command to search:
rpm -qa | grep <keywords>This would provide a list of installed packages whose name matches the keywords supplied.
How do I know if a package built from source is available?
A complete list of software built from source is provided this web page.
You can also browse the /usr/local directory via the ls command:
ls -l /usr/local/Software is installed under sub-directories named after the software.
For software specific instructions, please look at the list below and click/tap on the link to take you to that section:
- Available Software (/usr/local)
- Environment Modules (eMod)
- Using CUDA
- Using GCC
- Using Java
- Using VS Code
- Customizing .bashrc
- Environment Variables
- Installing Software
- Python Libraries
- Using Eclipse IDE
- Using Jupyter Notebook
- Using TensorFlow
Available Software (/usr/local)
Additional software (in addition to system software) is installed under the location /usr/local. This webpage lists the major software packages available on the CS systems.
How to use software available under /usr/local?
You will need to load the appropriate environment module for the software package you would like to use.
More information on environment modules is available on the environment modules guide.
What versions of software are available under /usr/local?
For many software, multiple versions are available. One can switch between versions using environment modules.
Complete list of software under /usr/local
| Software | Software Description | Command to Load the Software |
|---|---|---|
| Atom | A hackable text editor for the 21st Century | module load ide/atom |
| Calibre | A cross-platform open-source suite of e-book software | module load office/calibre |
| CLion | A cross-platform IDE for C and C++ by JetBrains | module load ide/clion |
| CUDA | Compute Unified Device Architecture, GPU programming tools See the cuda guide for setup instructions | module load cuda |
| Eclipse | Integrated development environment for Java | module load ide/eclipse/eclipse-java |
| Emacs | A highly extensible text editor | module load ide/emacs |
| FFMPEG | video/audio encoder/decoder library | module load dev/ffmpeg |
| GCC | GNU C Compiler collection See the gcc guide for details. | module load gcc |
| GitHub CLI | GitHub command-line tool | module load dev/github-cli |
| Go | Google Go programming language | module load compilers/go |
| Gradle | A build automation system that builds upon the concepts of Apache Ant and Apache Maven | module load dev/gradle |
| Hadoop | Map Reduce framework | module load big-data/hadoop |
| IntelliJ Idea | JetBrains IDE for Java and Kotlin development (community and ultimate editions) | For community edition:module load ide/intellij/communityFor ultimate edition: module load ide/intellij/ultimate |
| Intel Advisor Toolkit | A design and analysis tool for developing performant code | module load dev/intel-advisor |
| Intel ICX | Intel compiler suite (icx, etc) | module load compilers/icx |
| Java | Java Software Development Kit (SDK) | module load java |
| MatLab | Computational mathematics and programming language | module load matlab |
| Maven | Software project management | module load dev/maven |
| Mentor Graphics | Catapult Synthesis and Questa products | module load mentor |
| MongoDB | A key-value based database | module load big-data/mongodb |
| nvtop | An (h)top like task monitor for NVIDIA GPUs | module load tools/nvtop |
| OpenCV | Computer vision library | module load dev/opencv |
| Postman | An API platform for building and using APIs | module load dev/postman |
| PyCharm | JetBrains IDE for Python development ((community and Pro editions) | For community edition:module load ide/pycharm/communityFor Pro edition: module load ide/pycharm/pro |
| Racket | Sscheme programming language | module load compilers/racket |
| Rust | A multi-paradigm, general-purpose programming language designed for performance and safety | module load compilers/rust |
| sbt | Intereactive build tool for Scala, Java, and more | module load tools/sbt |
| Scala | Scala is a programming language for general software applications | module load compilers/scala |
| Spark | Fast and general engine for big data processing, with built-in modules for streaming, SQL, machine learning and graph processing. | module load big-data/spark |
| SWI-Prolog | A comprehensive free Prolog environment | module load compilers/swi-prolog |
| TexLive | A complete Latex suite | module load office/texlive |
| Visual Studio Code | An IDE from Microsoft | module load ide/visual-studio-code |
Environment Modules (eMod)
What are environment modules (eMod)?
On CS Linux systems, additional software is made available via Linux Environment Modules. This helps us to provide and maintain multiple versions of a variety of software. Users do not have to deal with details such as environment paths to different software versions or libraries. Modules will set or unset the appropriate paths for you.
How to see all available modules?
To see all available modules run module available command. Here is an example output:
--------------------- /usr/local/modules-alma9 ---------------------
aiml/ollama                   deprecated/tensorflow-1.15
av/ffmpeg/4.3.1               dev/github-cli
av/mplayer/1.4                dev/github-hub
big-data/hadoop               dev/gradle
big-data/mongodb              dev/intel-advisor
big-data/spark                dev/maven/3.3.9
cloud-tools/aws               dev/maven/3.5.4
cloud-tools/gcloud            dev/maven/3.6.3
cloud-tools/rclone            dev/maven/3.9.4
compilers/go                  dev/opencv/4.5.1
compilers/icx                 dev/postman
compilers/mpi/mpich-4.0.1     gcc/6.5.0
compilers/mpi/openmpi-i386    gcc/7.4.0
compilers/mpi/openmpi-slurm   gcc/8.2.0
compilers/mpi/openmpi-x86_64  gcc/9.3.0
compilers/racket              gcc/10.2.0
compilers/rust                gcc/11.2.0
compilers/scala               gcc/12.2.0
compilers/swi-prolog          gcc/13.2.0
...How to use a software via modules?
To use a specific software package, load the corresponding module. For instance, if you would like to use NVIDIA CUDA 12.8, use the command:
module load cuda/12.8As a good practice, when loading an environment module you must specify the full name of the module. Just like in the above example we used the complete name of the CUDA module (along with the version number). The full name for modules can be found in the output of module available command.
How to know which modules I have loaded?
To see which specific modules are loaded, run module list command:
$ module list
Currently Loaded Modulefiles:
1) cuda/12.8 2) gcc/13.2.0In the above example, we see that the user has loaded two modules: CUDA v12.8 and GCC v13.2.0
How to unload a module?
To remove a module from your environment, use the module unload <module-name> command. Let us unload the CUDA 12.8 module which we loaded before:
module unload cuda/12.8To verify, list the presently loaded modules:
$ module list
Currently Loaded Modulefiles:
1) gcc/13.2.0We see that the CUDA module is not loaded anymore.
How to unload all loaded modules?
Use the module purge command to unload all loaded modules.
module purgeNow as a check:
$ module list
No Modulefiles Currently Loaded.How to switch between software versions?
Use the module switch <module-name> command to switch to a different version of the software package. For example, let us assume we want to switch to CUDA version 11.6 from 12.8 (which we have already loaded).
First, confirm we have CUDA 12.8 loaded:
$ module list
Currently Loaded Modulefiles:
1) cuda/12.8We can also check the version of the nvcc compiler:
$ nvcc --version | grep release
Cuda compilation tools, release 12.8, V12.8.93This confirms that we are indeed using CUDA v12.8. Now, let us switch to CUDA v11.6
module switch cuda/11.6Let us see what modules are loaded now:
$ module list
Currently Loaded Modulefiles:
1) cuda/11.6So, this confirms that we have switched CUDA version from 12.8 to 11.6.
How can I make this persistent?
Most modules can be made to load at every login by adding the appropriate module load <module-name> statement in your shell configuration files (.bashrc or .cshrc).
Note that in non-login shells, the modules configuration environment can not automatically load.
If you need to use environment modules in non-login shells, non-interactive SLURM jobs, or other similar sessions, you will need to include the following in your shell config files:
BASH
source /etc/profile.d/modules.sh
module purgeTCSH
source /etc/profile.d/modules.csh
module purgeThese statements must be added before any module load statements. Following these, you could add any module load <module-name> statements.
Using CUDA
What is CUDA?
CUDA stands for Compute Unified Device Architecture. CUDA is a parallel computing architecure and C based programming language for general purpose computing on NVIDIA GPU’s
Which department machines support CUDA?
Below is a list of machines with higher-end CUDA cards:
| Host | GPU Qty | GPU(s) | Location | Exclusive Access |
|---|---|---|---|---|
| falcon cluster | 8 | A100 80GB | SR 475 | |
| falcon cluster | 2 | RTX 3090 24GB | SR 475 | |
| ahsoka | 1 | RTX 4000 Ada 20GB | Lab 225 | |
| anakin | 1 | RTX 4000 Ada 20GB | Lab 225 | |
| boba | 1 | RTX 4000 Ada 20GB | Lab 225 | |
| bo-katan | 1 | RTX 4000 Ada 20GB | Lab 225 | |
| cad-ban | 1 | RTX 4000 Ada 20GB | Lab 225 | |
| clan-wren | 1 | RTX 4000 Ada 20GB | Lab 225 | |
| ezra | 1 | RTX 4000 Ada 20GB | Lab 225 | |
| grogu | 1 | RTX 4000 Ada 20GB | Lab 225 | |
| hera | 1 | RTX 4000 Ada 20GB | Lab 225 | |
| hondo | 1 | RTX 4000 Ada 20GB | Lab 225 | |
| kallus | 1 | RTX 4000 Ada 20GB | Lab 225 | |
| kanan | 1 | RTX 4000 Ada 20GB | Lab 225 | |
| kuiil | 1 | RTX 4000 Ada 20GB | Lab 225 | |
| loth-cats | 1 | RTX 4000 Ada 20GB | Lab 225 | |
| mando | 1 | RTX 4000 Ada 20GB | Lab 225 | |
| nightsisters | 1 | RTX 4000 Ada 20GB | Lab 225 | |
| obi-wan | 1 | RTX 4000 Ada 20GB | Lab 225 | |
| palpatine | 1 | RTX 4000 Ada 20GB | Lab 225 | |
| rex | 1 | RTX 4000 Ada 20GB | Lab 225 | |
| sabine | 1 | RTX 4000 Ada 20GB | Lab 225 | |
| satine | 1 | RTX 4000 Ada 20GB | Lab 225 | |
| tarkin | 1 | RTX 4000 Ada 20GB | Lab 225 | |
| thrawn | 1 | RTX 4000 Ada 20GB | Lab 225 | |
| tusken | 1 | RTX 4000 Ada 20GB | Lab 225 | |
| ventress | 1 | RTX 4000 Ada 20GB | Lab 225 | |
| zeb | 1 | RTX 4000 Ada 20GB | Lab 225 | |
| anchovy | 1 | RTX 4000 Ada 20GB | Lab 325 | |
| barracuda | 1 | RTX 4000 Ada 20GB | Lab 325 | |
| blowfish | 1 | RTX 4000 Ada 20GB | Lab 325 | |
| bonito | 1 | RTX 4000 Ada 20GB | Lab 325 | |
| brill | 1 | RTX 4000 Ada 20GB | Lab 325 | |
| bullhead | 1 | RTX 4000 Ada 20GB | Lab 325 | |
| char | 1 | RTX 4000 Ada 20GB | Lab 325 | |
| cod | 1 | RTX 4000 Ada 20GB | Lab 325 | |
| dorado | 1 | RTX 4000 Ada 20GB | Lab 325 | |
| eel | 1 | RTX 4000 Ada 20GB | Lab 325 | |
| flounder | 1 | RTX 4000 Ada 20GB | Lab 325 | |
| grouper | 1 | RTX 4000 Ada 20GB | Lab 325 | |
| halibut | 1 | RTX 4000 Ada 20GB | Lab 325 | |
| herring | 1 | RTX 4000 Ada 20GB | Lab 325 | |
| mackerel | 1 | RTX 4000 Ada 20GB | Lab 325 | |
| marlin | 1 | RTX 4000 Ada 20GB | Lab 325 | |
| perch | 1 | RTX 4000 Ada 20GB | Lab 325 | |
| pollock | 1 | RTX 4000 Ada 20GB | Lab 325 | |
| sardine | 1 | RTX 4000 Ada 20GB | Lab 325 | |
| shark | 1 | RTX 4000 Ada 20GB | Lab 325 | |
| sole | 1 | RTX 4000 Ada 20GB | Lab 325 | |
| swordfish | 1 | RTX 4000 Ada 20GB | Lab 325 | |
| tarpon | 1 | RTX 4000 Ada 20GB | Lab 325 | |
| turbot | 1 | RTX 4000 Ada 20GB | Lab 325 | |
| tuna | 1 | RTX 4000 Ada 20GB | Lab 325 | |
| wahoo | 1 | RTX 4000 Ada 20GB | Lab 325 | |
| earth | 1 | Titan V 12GB | SR 475 | |
| jupiter | 1 | Titan V 12GB | SR 475 | |
| mars | 1 | Titan V 12GB | SR 475 | |
| mercury | 1 | Titan V 12GB | SR 475 | |
| neptune | 1 | Titan V 12GB | SR 475 | |
| saturn | 1 | Titan V 12GB | SR 475 | |
| uranus | 1 | Titan V 12GB | SR 475 | |
| venus | 1 | Titan V 12GB | SR 475 | |
| winter-park | 1 | Titan V 12GB | SR 475 | |
| lamborghini | 1 | GeForce GTX TITAN X 12GB | SR 475 | |
| lotus | 1 | GeForce GTX TITAN X 12GB | SR 475 | |
| maserati | 1 | GeForce GTX TITAN X 12GB | SR 475 | |
| porsche | 1 | GeForce GTX TITAN X 12GB | SR 475 | |
| old_ahsoka | 1 | GeForce RTX 3080 10GB | SR 475 | |
| old_anakin | 1 | GeForce RTX 3080 10GB | SR 475 | |
| old_boba | 1 | GeForce RTX 3080 10GB | SR 475 | |
| old_bo-katan | 1 | GeForce RTX 3080 10GB | SR 475 | |
| old_chopper | 1 | GeForce RTX 3080 10GB | SR 475 | |
| old_clan-wren | 1 | GeForce RTX 3080 10GB | SR 475 | |
| old_ezra | 1 | GeForce RTX 3080 10GB | SR 475 | |
| old_grogu | 1 | GeForce RTX 3080 10GB | SR 475 | |
| old_hera | 1 | GeForce RTX 3080 10GB | SR 475 | |
| old_hondo | 1 | GeForce RTX 3080 10GB | SR 475 | |
| old_kallus | 1 | GeForce RTX 3080 10GB | SR 475 | |
| old_kanan | 1 | GeForce RTX 3080 10GB | SR 475 | |
| old_kuiil | 1 | GeForce RTX 3080 10GB | SR 475 | |
| old_loth-cats | 1 | GeForce RTX 3080 10GB | SR 475 | |
| old_mando | 1 | GeForce RTX 3080 10GB | SR 475 | |
| old_nightsisters | 1 | GeForce RTX 3080 10GB | SR 475 | |
| old_obi-wan | 1 | GeForce RTX 3080 10GB | SR 475 | |
| old_omega | 1 | GeForce RTX 3080 10GB | SR 475 | |
| old_palpatine | 1 | GeForce RTX 3080 10GB | SR 475 | |
| old_rex | 1 | GeForce RTX 3080 10GB | SR 475 | |
| old_sabine | 1 | GeForce RTX 3080 10GB | SR 475 | |
| old_satine | 1 | GeForce RTX 3080 10GB | SR 475 | |
| old_tarkin | 1 | GeForce RTX 3080 10GB | SR 475 | |
| old_thrawn | 1 | GeForce RTX 3080 10GB | SR 475 | |
| old_ventress | 1 | GeForce RTX 3080 10GB | SR 475 | |
| old_zeb | 1 | GeForce RTX 3080 10GB | SR 475 | |
| kale | 1 | GeForce GTX 1060p 6GB | SR 475 | |
| kelp | 1 | GeForce GTX 1060p 6GB | SR 475 | |
| leek | 1 | GeForce GTX 1060p 6GB | SR 475 | |
| lettuce | 1 | GeForce GTX 1060p 6GB | SR 475 | |
| mushroom | 1 | GeForce GTX 1060p 6GB | SR 475 | |
| okra | 1 | GeForce GTX 1060p 6GB | SR 475 | |
| onion | 1 | GeForce GTX 1060p 6GB | SR 475 | |
| parsley | 1 | GeForce GTX 1060p 6GB | SR 475 | |
| parsnip | 1 | GeForce GTX 1060p 6GB | SR 475 | |
| pea | 1 | GeForce GTX 1060p 6GB | SR 475 | |
| pepper | 1 | GeForce GTX 1060p 6GB | SR 475 | |
| potato | 1 | GeForce GTX 1060p 6GB | SR 475 | |
| pumpkin | 1 | GeForce GTX 1060p 6GB | SR 475 | |
| radish | 1 | GeForce GTX 1060p 6GB | SR 475 | |
| rhubarb | 1 | GeForce GTX 1060p 6GB | SR 475 | |
| romanesco | 1 | GeForce GTX 1060p 6GB | SR 475 | |
| rutabaga | 1 | GeForce GTX 1060p 6GB | SR 475 | |
| shallot | 1 | GeForce GTX 1060p 6GB | SR 475 | |
| spinach | 1 | GeForce GTX 1060p 6GB | SR 475 | |
| squash | 1 | GeForce GTX 1060p 6GB | SR 475 | |
| tomatillo | 1 | GeForce GTX 1060p 6GB | SR 475 | |
| tomato | 1 | GeForce GTX 1060p 6GB | SR 475 | |
| turnip | 1 | GeForce GTX 1060p 6GB | SR 475 | |
| wasabi | 1 | GeForce GTX 1060p 6GB | SR 475 | |
| yam | 1 | GeForce GTX 1060p 6GB | SR 475 | |
| zucchini | 1 | GeForce GTX 1060p 6GB | SR 475 |
How do I configure my shell environment for CUDA development?
The NVIDIA graphics driver and CUDA compilier are already installed on machines that support CUDA. However, one must set some environment variables in order to run and write CUDA enabled programs.
This can be done using environment modules.
First, to see what versions of CUDA are available:
$ module available cuda
------------------------ /usr/local/modules-alma9 ------------------------
cuda/9.1   cuda/11.6  cuda/11.8  cuda/12.1  cuda/12.8
cuda/10.2 cuda/11.7 cuda/12.0 cuda/12.6To load the latest version of CUDA:
$ module load cudaOr to load a specific version of CUDA:
$ module load cuda/12.6Confirm:
$ module list
Currently Loaded Modulefiles:
1) cuda/12.6And:
$ nvcc --version | grep release
Cuda compilation tools, release 12.6, V12.6.85How can I switch to a different version of CUDA?
If you have loaded a CUDA version and would like to switch to a different version:
$ module load cuda/12.6Using GCC
In addition to the default GCC provided by the OS, we have several older and newer versions of GCC compiler available. To see what versions of GCC are available:
$ module available gcc
------------------------ /usr/local/modules-alma9 -------------------------
gcc/6.5.0  gcc/8.2.0  gcc/10.2.0  gcc/12.2.0  gcc/15.1.0
gcc/7.4.0 gcc/9.3.0 gcc/11.2.0 gcc/13.2.0To load the latest version of GCC:
$ module load gccOr to load a specific version of GCC:
$ module load gcc/11.2.0Confirm:
$ module list
Currently Loaded Modulefiles:
1) gcc/11.2.0And:
$ gcc --version
gcc (GCC) 11.2.0How can I switch to a different version of GCC?
If you have loaded a GCC version and would like to switch to a different version:
$ module switch gcc/<VERSION>Using Java
What versions of JAVA are available?
In addition to the default JAVA provided by the OS, we have several older and newer versions of JAVA compiler available. To see what versions of JAVA are available:
$ module available java
------------------------ /usr/local/modules-alma9 -------------------------
java/11 java/15 java/17 java/20 java/21To load the latest version of JAVA:
$ module load javaOr to load a specific version of JAVA:
$ module load java/17Confirm:
$ module list
Currently Loaded Modulefiles:
1) java/17And to confirm:
$ java --version
openjdk 17.0.17 2025-10-21 LTS
⋮
$ javac --version
javac 17.0.17How can I switch to a different version of JAVA?
If you have loaded a JAVA version and would like to switch to a different version:
$ module switch java/<VERSION>Using VS Code
How do I use Visual Studio Code ?
VS Code editor is installed on all CS machines. You can launch the editor by finding it in the Applications menu. If you would like to launch it from within a terminal, via the code command, you will need to load the necessary environment module as shown below:
$ module load ide/visual-studio-codeAfter that, the code command will be available in your current terminal session. Refer to Environment Modules page for more information on how to find and use modules and make them persistent.
How do I use Visual Studio Code remotely?
In this use-case Visual Studio Code is installed and running on your personal machine (laptop or desktop). You write and edit code on your laptop, but connect to the CS machines for running the code. The connection is handled by a proprietary SSH extension which you will need to install on your laptop.
Warning
It is not feasible for SNA to support this use case, yet we are listing some common issues and troubleshooting steps below.
Troubleshooting Remote VS Code Connection
SNAs are not experts on the specific details of VS Code or its proprietary extensions, however, we have encountered a few common issues that users may experience when using VS Code remotely. These issues include:
- Connection drops
- VS Code repeatedly asking for a password even though supplied password is correct
- Multiple sessions can’t exist simultaneously
- Only the session from the last connected server will work
- Connections work on some machines and do not work on some other machines.
Possible Causes
When a user connects remotely to a CS machine via VS code, it creates a sub-directory under the user’s home directory to facilitate the connection. We believe that corruption of files under vscode directories is likely the main cause of most connection issues. Since home directories on CS Linux machines are shared across machines, your home directory and its content is the same on all machines. This increases the likelyhood of clashes and overwriting files when one logs in to multiple machines via remote vscode. Other causes of corruption could be:
- Accessing multiple CS machines simultaneously while using VS Code.
- Ungraceful shutdown of a connection on one machine and re-connecting to another machine.
Suggested Solution
The ideal solution is to change the default path of VS Code server directory to a path local on the remote host you are connecting to. By default the location is ~/.vscode-server, which is in your home directory. The following steps will show how to change this.
- Delete the
~/.vscode-serverdirectory by logging in without VS Code, using an SSH client to connect (see here). Enter the following commands:pkill -u noderm -rf ~/.vscode-server - Open VS Code on your laptop
- Go to the Settings
- Go to Remote SSH extension’s settings by typing
@ext:ms-vscode-remote.remote-ssh installin the search box (see screenshot below)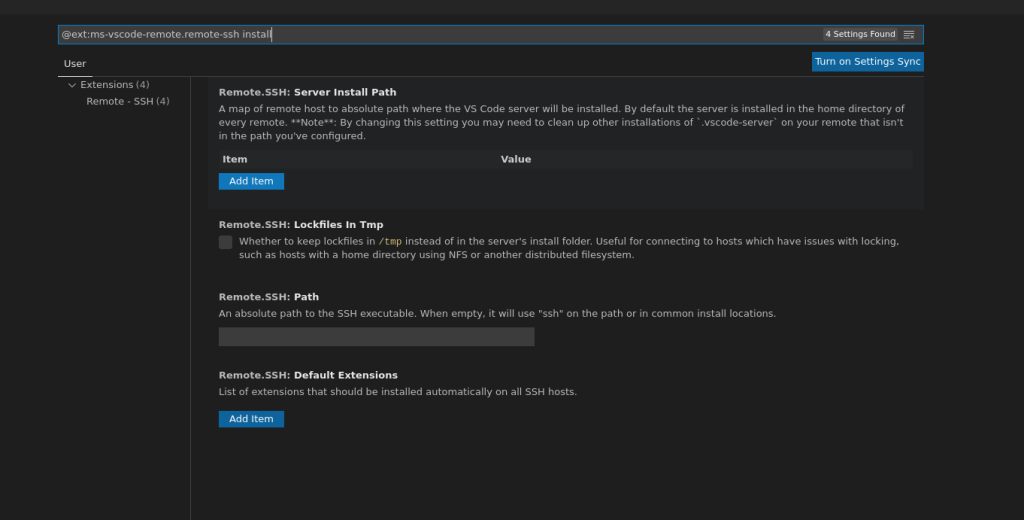
- Now, under Server Install Path, click Add Item and add the following key:value pair
Item = hostValue = /s/$HOSTNAME/a/tmp/$USER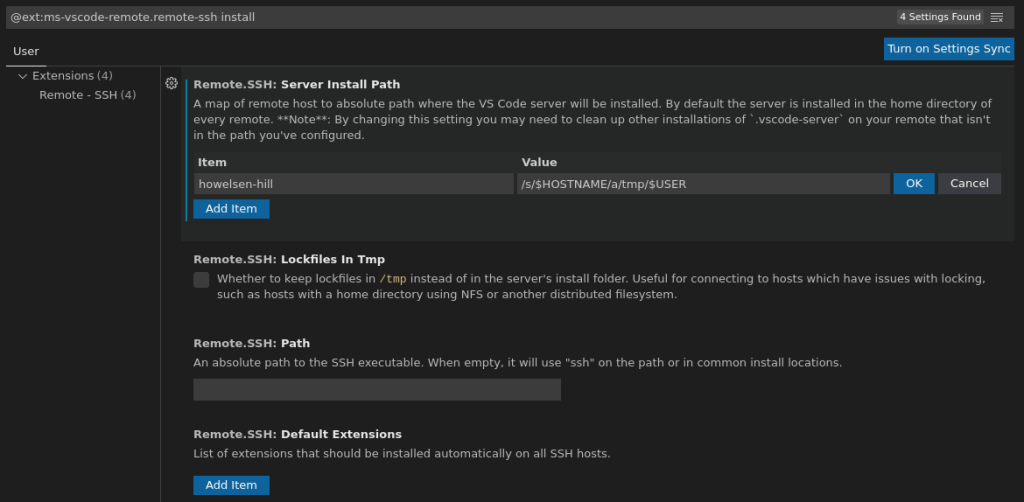
- Click OK
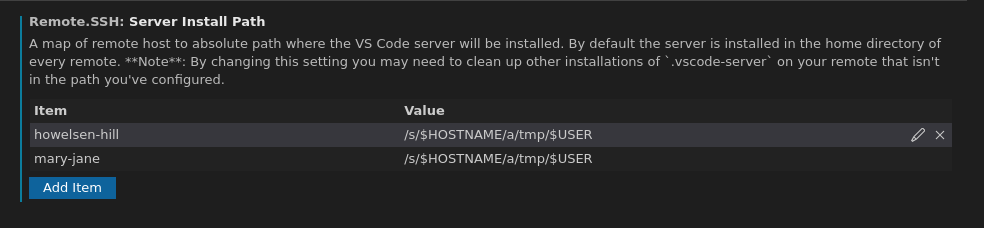
- Do this for each and every host in your SSH configuration. Click Add Item to add more hosts. Notice how the path stays the same for all hosts, see screenshot below
- Now connect to one of the remote machines and you would notice that the .vscode-server directory gets created on a local filesystem on this host, not in your home directory.
Warning
In Step 5 above, the “host” in the Item field must match with the host you have in your SSH config file. The Value field stays the same for all hosts, so use the exact value as listed above.
Tip
Always close your remote connections via File ⮕ Close Remote Connection instead of just closing the window.
Customizing .bashrc
What is .bashrc?
.bashrc is a shell script that the Bash shell uses to configure and customize your shell environment. It is typically used to change prompts, set environment variables, define command aliases and define shell functions. Other shells use their own specific dot files.
Where is the .bashrc file located?
The .bashrc file lives in your home directory. Since it is a dot file (filename begins with a “.”, it is hidden). To see if it exists:
$ ls -la ~/.bashrcHow do I set environment variables in my .bashrc file?
You can use the .bashrc file to define environment variables like PATH, LD_LIBRARY_PATH, PYTHONPATH, etc. Once you define these variables in the .bashrc file, your shell would know the paths since .bashrc is read at every login.
Let’s say you want to use two software from /usr/local/, CUDA and Eclipse IDE. For this you would define the PATH variable by adding the following lines to your .bashrc file:
# add cuda and eclipse to command path
export PATH=/usr/local/cuda/latest/bin:$PATH
export PATH=/usr/local/eclipse/java/latest/bin:$PATHSave the file and source it for changes to be applied to the current shell.
$ source ~/.bashrcHow do I confirm that the environment variable configuration has been applied?
You can confirm by using the printenv command. The command output should contain the paths you added.
$ printenv $PATH
/usr/local/eclipse/java/latest/bin:/usr/local/cuda/latest/bin:/bin:/usr/bin:/sbin:/usr/sbin:/usr/local/binWhere do I add the environment variable settings in the .bashrc file?
You can add these lines at any place in the .bashrc file, however, note that these variables get built as the shell reads the file. So, be careful with multiple definitions of the same variable in your .bashrc file.
I have messed up my .bashrc file. How do I fix it?
You can get a fresh copy of the default .bashrc file using these commands:
/bin/mv ~/.bashrc ~/.bashrc.backup
/bin/cp ~info/dot.files/.bashrc ~/.bashrcEnvironment Variables
What are environment variables?
In Unix based systems, environment variables are variables that are defined for the current shell and are inherited by any child shells or processes. Environmental variables contain information that tells your shell where to find resources.
Why should I care about environment variables?
Environment variables allow you to customize your Unix environment. For example, you may change the default text editor, the path to executable files and libraries by setting appropriate environment variables. On the CS machines, additional software can be used by tweaking your environment variables.
How do environment variables look like?
The environment variables look like strings that represent key-value pairs. They generally look something like this:
/bin/mv ~/.bashrc ~/.bashrc.backup
/bin/cp ~info/dot.files/.bashrc ~/.bashrcNote:
- The names of the variables are case-sensitive. By convention, environment variables should have UPPER CASE names.
- If multiple values are passed for a key, they should be separated by colon (:) characters.
- If the value contains spaces, quotes should be used
- There is no space around the equals = symbol.
What are some important environment variables that I should know?
Here are some of the important variables:
| Variable Name | Description |
|---|---|
| HOME | The current user’s home directory. |
| LD_LIBRARY_PATH | An ordered list of directories that are checked when looking for libraries. |
| PATH | An ordered list of directories that are checked when looking for binaries (commands). |
| PYTHONPATH | An ordered list of directories that are checked when looking for Python libraries (modules). |
| SHELL | The default shell for you. It is set to be bash by default, but other values can be set if you prefer other options. |
How do I set environment variables?
You can use the export command to define and set environment variables. For example, if you want to set a new variable named FOO, having the value bar, use the following command:
$ export FOO="bar"How do I confirm that the environment variable configuration has been applied?
You can confirm by using the printenv command. To see if the FOO variale we defined in the previous question was successfully set, use:
$ printenv $FOO
barYou should see the value you had defined for the variable.
Warning
Environment variables created in a terminal shell are available only in the current session. If you open a new shell or if you log out all variables will be lost. For making them persistent, see the bashrc guide.
How do I delete environment variables?
You can use the unset command to remove environment variables. For example, to delete the variable we created earlier:
$ unset FOOIs the command export PATH=/usr/local/foo/latest/bin:$PATH the same as export PATH=$PATH:/usr/local/foo/latest/bin?
No. The order matters. When a user types in a command, the system checks directories in this order for the executable. So, for export PATH=/usr/local/foo/latest/bin:$PATH, the location /usr/local/foo/latest/bin is searched before any other location in the binaries path. And for export PATH=$PATH:/usr/local/foo/latest/bin the /usr/local/foo/latest/bin is searched for at the last.
In fact, by changing the order of directory locations in your environment variables, you can tweak which locations get more preference for locating software. This is useful if a software is available from more than one location.
Installing Software
How do I install software?
You can install software under your home directory. Most software support installation under non-system locations. If you are building from source, you can change the install location to some directory in your home directory. For instance, in the traditional method of building software from source code, generally called the configure-make-install method, you could set the install location in the configure step using the --prefix= option.
Here is an example of installing a software named foo in a directory named bar (in your home directory) from the source file foo.tar.gz
tar xvzf foo.tar.gz
cd foo
./configure --prefix=~/bar
make
make installAfter a successful build, you would find a typical directory structure under the install directory:
bar
├── bin
├── lib
└── shareNow to use this software, you would need to add the install paths for binaries and libraries (at the least) to your environment variables:
export PATH="~/bar/bin:$PATH"
export LD_LIBRARY_PATH="~/bar/lib:$LD_LIBRARY_PATH"How do I install Python libraries?
You may install Python libraries under your home directory. The easiest way to do this is using pip. If the library is not available via PyPI, you might need to build it from source, using the instructions above.
When installing via pip, the install files go under the .local directory under your home directory. Let’s say you want to install a Python library named foo.
pip3 install foo --userNow, you should be able to use the library you just installed.
>>> import foo
>>>Python Virtual Environments
You can create Python virtual environments to install different Python libraries. This is very helpful when you’re working on multiple research papers or courses requiring different versions of libraries and want to keep everything organized separately.
Since we have various sources and versions of Python available, you should first load the right environment module depending on the Python version you want to use. After that, creating a virtual environment on CS machines is similar to doing it on any other Linux machine.
To create a virtual environment using Anaconda, you would do:
module load python/anaconda
conda create -n my-env python=3.x anacondaAnd to create one using “venv” you would:
module load python/bundle-3.x
python3.x -m venv my-envPlease note that if you install Python libraries within your virtual environment, additional configuration of your environment paths may be required. This depends on the method used to create your virtual environment and its location.
Tip
If you have loaded one of the Python bundles via environment modules, you do not need to set the paths above. The modules take care of that automatically.
Warning
The Anaconda environment module does not automatically handle user-installed Python paths, so you will need to set the paths appropriately.
Python Libraries
What versions of Python are available?
We have several different versions of the Python interpreter available, see details below.
Warning
Python v2.x is not supported.
Where are Python libraries installed?
Python libraries are sourced from system packages, python module bundles, from source code and from Anaconda. Each type of source has a different install location, as discussed in the next answer.
How do I use Python libraries?
For Python modules coming from system packages you need not make any changes to your environment paths. But to use any other form of Python libraries, you would need to add the install location to your environment paths.
Tip
Although possible, it is generally not recommended to mix Anaconda’s libraries with any of the bundles.
Refer to the links below for more information on how to use these Python modules.
Anaconda
Anaconda brings in a lot of open-source Python modules and it’s own Python interpreter. Popular modules like Jupyter Notebook, TensorFlow, CUDA, CuDNN, PyTorch, OpenCV etc are included in this install. The current version of Anaconda provides Python v3.10
To use Anaconda (with Python v3.10), run the following command:
module load python/anacondaOnce this has been done, verify that you are using Anaconda’s Python interpreter by the command:
which pythonThis should return:
/usr/local/anaconda3/2023.03/bin/pythonTo use Python v3.9 via Anaconda, use the following command instead of above:
module load python/anaconda/py3.9-2022.08 To use Python v3.8 via Anaconda, use the following command instead of above:
module load python/anaconda/py3.8-2021.11To see if a module is installed, use the conda command. For instance, if you would like to check whether tensorflow is installed :
$ conda list tensorflow
# packages in environment at /usr/local/anaconda3/2023.03:
#
# Name                    Version                   Build  Channel
tensorflow                2.12.0                   pypi_0    pypi
tensorflow-estimator      2.12.0                   pypi_0    pypi
tensorflow-io-gcs-filesystem 0.33.0 pypi_0 pypiNow you may use the modules provided by Anaconda.
Bundle (Python 3.9)
This is a complete bundle of various Python libraries for Python 3.9
To use this, run the following command:
module load python/bundle-3.9d
ls -l /usr/local/python-env/py39/lib/python3.9/site-packagesNote
The versions of packages in the bundle are frozen. If you need a specific version for a package, please contact us.
Bundle (Python 3.11)
This is a complete bundle of various Python libraries for Python 3.11
To use this, run the following command:
module load python/bundle-3.11d
ls -l /usr/local/python-env/py311/lib/python3.11/site-packagesNote
The versions of packages in the bundle are frozen. If you need a specific version for a package, please contact us.
Bundle (Python 3.13)
This provides Python libraries for Python 3.13
To use this, run the following command:
module load python/bundle-3.13A Python library I need is not installed. What are my options?
You could install the module in your home directory, see this page for more information. Or contact us and we will help you out.
Using Eclipse IDE
How do I use Eclipse IDE on the CS machines?
From the Applications menu: Applications ⮕ Development ⮕ Eclipse IDE for Java
If you would like to use the command line to start Eclipse, first add the install directory to your environment path:
module load ide/eclipse/eclipse-javaThen run Eclipse via the command:
eclipseEclipse is acting wonky and I am unable to create a new java class in an eclipse project. How can I fix this?
This is usually caused by a corruption in your local Eclipse space. The remedy is to back up your local eclipse settings and relaunch eclipse.
cd
mv .eclipse .eclipse_backup
eclipseOnce the problem goes away don’t forget to remove your .eclipse_backup.
Note
You will lose any custom plugins/settings you have currently installed.
Using Jupyter Notebook
How do I use JupyterNotebook ?
You may use either Anaconda, or the modules bundle for Python 3.6/3.8/3.9. Configure your environment as shown in the Python Libraries section. After you have configured it, you can use JupyterNotebook as:
cd
mv .eclipse .eclipse_backup
eclipseNote that this command starts the JupyterNotebook server on port 8888 and opens a browser window. This works if you are logged into a physical session on the machine, or through a remote desktop connection.
How do I use JupyterNotebook remotely?
You can either use the remote desktop connection to connect to a CS machine via a GUI session and start JupyterNotebook as explained above, or use SSH tunneling.
SSH tunneling is explained below:
- Connect to a CS machine via SSH (follow this guide)
- Set up your environment with either Anaconda, or the modules bundle for Python 3.6/3.8 as shown in the Python Libraries section.
- Start JupyterNotebook without opening the browser (that’s the key), via the command:
jupyter-notebook --no-browser --port=9090 - Now set up an SSH tunnel to a CS machine, from your laptop. Type this command in a terminal on your laptop (and not on the CS machine):
ssh -N -L 9090:localhost:9090 your-eid@cs-machine-name.cs.colostate.edu
Replaceyour-eidwith your CS username andcs-machine-namewith an actual name of a CS machine. - Now on your laptop, open this URL in a browser:
http://localhost:9090/
Using TensorFlow
How do I use TensorFlow version 2.x ?
You may use either Anaconda, or the modules bundle for Python 3.6/3.8/3.9. Configure your environment as shown in the Python Libraries section. After you have configured it, you can use TensorFlow as:
$ python3
Python 3.9.13 | packaged by conda-forge | (main, May 27 2022, 16:56:21)
[GCC 10.3.0] on linux
Type "help", "copyright", "credits" or "license" for more information.
>>> import tensorflow as tf
>>> tf.version.VERSION
'2.9.1'How do I use TensorFlow version 1.x ?
We have version 1.15 available, if you need to use the older version of TensorFlow. Both CPU and GPU packages are installed. Use the following command:
module load deprecated/tensorflow-1.15After you have configured it, you can use TensorFlow as:
module load deprecated/tensorflow-1.15LOADING THE DEPRECATED MODULE IS BROKEN.
